

What Dog Breeds Have Weepy Eyes?
Epiphora
There’s a name for all those those tears Buddy’s been shedding: epiphora. Formally referred to as “watery ocular discharge,” excess tears is a common issue for pet owners. If your pooch has excess tears running down his face, over time, they’ll stain his fur to a reddish-brown color. Sometimes it’s hard to notice the stains on a dog with a dark face, but dark-colored dogs experience epiphora as often as their fair relatives. Over time, chronic excess tearing can lead to skin irritation, odor and infection.
Weepy Breeds
Brachycephalic is not a word you see or hear much, but if you break it down to its Greek roots, you’ll understand: “brachy” means short and “cephalic” means head. If Buddy’s a pooch with a short or pushed in face, he’s vulnerable to epiphora. Breeds in this class include shih tzu, Pekingese, boxer, pug, Boston terrier and bulldog. These dogs have shallow eye sockets or hair growth in the skin folds around their eyes, which makes tear drainage a problem. Bichon frise, Maltese and poodles have the same issues, and poodles and cocker spaniels are more prone to blocked tear ducts than other breeds.
Why The Tears
Buddy doesn’t have to be of a breed that’s vulnerable to weepy eyes to have them. There are two reasons a dog may have weepy eyes: irritation and poor tear drainage. Allergies, stray hairs or objects, environmental irritants such as smog or dust, and ingrown hairs all can cause irritation leading to epiphora. If that’s Buddy’s problem, the vet should be able to address the issue and put an end to the crying and the stains. However, sometimes the tears don’t drain properly. In a healthy eye, when a dog’s eye tears up, the tears will go through small “drain holes” in his eyes to his nasal passage down to his throat. Conditions interrupting this process include shallow eye sockets, eyelids that are turned inward, blocked tear drainage holes and hair growth around the eye, which redirects tears onto the face.
Controlling Tears
In some cases, surgery can help dry up those excess tears. A blocked duct can be flushed out and some eyelid problems can be corrected surgically to eliminate the irritation. If the irritation is due to something in the environment, minimizing Buddy’s exposure to it will help. There’s nothing to do for a dog with shallow eye sockets; after all, it’s the way he’s made. Your best option is to keep on top of his tear stains by gently washing around his eyes with a wet, warm paper towel. Your vet can recommend appropriate wipes to safely keep his face clean and tear-stain free.
Schools for Training Cadaver Dogs
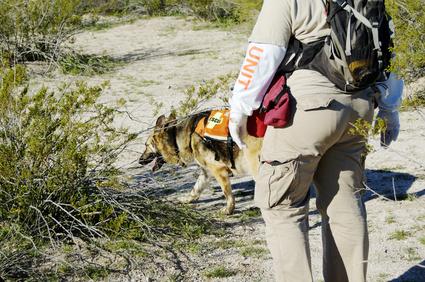
Search and Rescue Dogs of the United States
Search and Rescue Dogs of the United States trains dogs for Type 1 Human Remains Detection (HRD). With this training type, the qualifying dogs should be able to detect human remains within natural debris fields or wilderness areas within a 200 by 200 foot area. They should also be able to locate buried bodies within a 75 by 75 foot area. The dogs must exhibit self-sustainability for 24 hours and have the stamina to endure 12 hour search missions. At the conclusion of the course, the dogs and handlers must pass a standard HRD test.
Mountain View Dog Training
Mountain View Dog Training is owned and operated by dog training specialist Sheila K. McKee. Mountain View trains any working breed of dog for human remains detection but notes that retrievers often work best. Dogs should be 10 months to 2 years old with good social skills and in good health in order to complete the training. Training for HRD certification takes 160 to 200 hours. Mountain View uses FEMA Canine Search Readiness Evaluation Type II Elements, focusing on obedience, agility and directional control. While the school does not offer the HRD evaluation, it states that dogs trained there should be able to pass with little effort. Mountain View also offers an 80 hour handler training course, as well as lifelong handler/dog communication.
Highland Canine Training
Highland Canine Training offers both obedience and working dog training, including human remains detection. Highland Canine Training trains HRD dogs for both water and land detection. Dogs can be trained to alert handlers with an active move or a passive one. The facilities feature FEMA regulated agility courses, a rubble pile and a pond for training. Evaluation for a dog’s potential as a HRD dog is free of charge but the training courses, including handler training, do cost money.
Bear Search and Rescue Foundation
Bear Search and Rescue Foundation earns its name from the courageous rescue dog Bear, one of the first rescue dogs who headed to Ground Zero to seek out survivors and deceased persons after the 9/11 attacks. Following Bear’s passing, his owners created the foundation in order to train other dogs to follow in Bear’s footsteps. While based in New York, Bear Search and Rescue travels around the country teaching trailing and cadaver courses. The courses provided work for both beginners and higher level cadaver dogs. Introduction courses last about three days, while the intensive training courses last about four to five days.
My Dog Is Having Problems Adjusting to a New Environment
Familiarity
A new home has lots of unfamiliar smells, sights and spaces that can intimidate your pooch. Calm him by immediately unpacking and providing him with his old bed, bowls, toys, blankets, leash and crate. Don’t wash these items prior to giving them to him, so that they smell and feel the same to him. Feed him the same food he was eating in his old home or in the shelter you adopted him from, so that you don’t cause him any stomach upset with a new diet. Abruptly changing Fido’s diet can lead to diarrhea and house soiling issues.
Routine
Canine companions thrive when they have a daily routine to follow, which reduces their anxiety in a new environment. Establish this routine during your pup’s first few days with you or, if possible, keep his feeding, exercise and sleeping times the same as in his old home. You also want to keep the locations of his sleeping spot and food and water dishes the same in his new home as in his old one. For example, if you fed Fido in the kitchen and kept his doggie bed or crate in the living room of your old home, do so in your new one. This keeps his routine consistent, even in a different space.
Positive Reinforcement
If Fido is moping around his new home, having potty accidents or being destructive, avoid punishing him for this behavior, which may make him uncomfortable in his new environment and afraid of you as well. Instead, reward him when he’s behaving in a happy or calm way with attention and treats. Walk him around his new neighborhood, rewarding him with treats along the way and slowly introducing him to the new sights, smells, people and other dogs who live in the area. Establish a new potty spot for him outdoors that you consistently bring him out to several times daily to prevent accidents in the home; reward him when he eliminates outside.
Considerations
Bring Fido to the vet if any behavioral issues develop and last for more than a few days after coming to your home. Your vet can rule out a medical condition for any unusual or destructive behavior. Keep a positive attitude and demeanor around your dog during your move and when setting up your new home. Canine companions pick up on the emotions of their caregivers and may become anxious if they sense you are stressed out. Further diminish his anxiety by using a synthetic dog pheromone spray around your new home to put Fido at ease and get him used to his new environment.
A Complete Guide to Helping Your Older Dog Live a Longer Life
Nutrition
As your buddy grows older, his dietary needs change. Older dogs generally need food that is lower in fat while still maintaining protein content. Feeding your dog smaller meals more often is easier on his aging digestive system. Your veterinarian might also suggest adding supplements such as omega-3 fatty acids, vitamin C or antioxidants to your dog’s diet, depending on his health. Giving your dog some pork hide to chew and brushing his teeth with dog toothpaste after meals will reduce his chances of gum disease and prevent the introduction of harmful bacteria into his system, potentially adding years to his life.
Environmental Changes
Older dogs will benefit from a few creature comforts they didn’t need in their younger years. Your pal can’t regulate his temperature as well has he used to, so give him a warm, dry place to sleep and don’t let him get too hot when exercising. He may also need more time inside and could use a ramp instead of stairs to make climbing easier on his joints. If your dog is having vision problems, try to keep your house’s layout predictable so it’s easier for him to navigate.
Veterinary Care
Consistent veterinary care and preventative testing will help keep your pal healthy in his later years. Yearly blood tests and a blood titer to see if he needs any booster shots on his vaccines may be a good place to start, if your vet recommends them. Getting your dog a checkup a few times a year instead of just once will also give him an advantage. Be on the lookout for signs that something could be wrong, such as a decrease in appetite, sudden weight gain, vomiting, diarrhea, hair loss, weakness, changes in housebreaking, increased thirst or rapid or strained breathing even when at rest.
Physical and Mental Exercise
Proper exercise is important to keep your pet sharp and healthy. Keep your dog as active as he can safely handle to help him stay healthy. Dogs who get little to no exercise often lose their health much more quickly, while dogs who stay in a healthy weight range live an average of 1.8 years longer, so keep your buddy fit. You should also spend time with your dog and give him a little mental exercise, whether you ask him to do tricks (as long as they’re easy on his joints) or just interact with him, to help keep his mind strong.
Is One Piece of Chocolate Detrimental to a Dog’s Health?

Theobromine and Chocolate
The poisonous factor in chocolate is its theobromine, which is a type of methylxanthine. To humans, theobromine produces subtle stimulating responses. Those responses, however, are markedly more intense in dogs. Tiny portions of theobromine from chocolate can be hazardous to pooches, often leading to throwing up, unusually antsy behavior, panting, loose stools, quivering and problems with heart rhythms. In severe situations, significant consumption of chocolate can even bring upon seizures and comas in dogs. Some dogs can pass away from it, too. This is why it’s so important to never give your pet chocolate. It’s also important to make sure he never gets it on his own, whether by going through your kitchen cabinet or exploring the contents of your trashcan.
Kinds of Chocolate and Toxicity
“One piece” of chocolate can mean many different things. Different kinds of chocolate contain varying amounts of theobromine, for one. Not all single pieces of chocolate are the same size, either. Darker chocolate, in general, has more theobromine and is therefore more hazardous to dogs. Baking chocolate and good dark chocolate often have 130 to 450 milligrams for every single ounce. Milk chocolate, on the other hand, generally has markedly less, with a typical 44 to 58 milligrams for every ounce. Lastly, white chocolate has the least theobromine, as it typically has just 0.25 mg for every ounce. Since there’s absolutely no reason for your dog to have chocolate in his diet, the smartest thing you can do is make sure he never even has the slightest taste of it. If it’s large enough, one piece of chocolate can indeed be detrimental to your dog’s health, especially if it’s dark.
Chocolate Size and Toxicity
A single “piece” of chocolate can sometimes be as big as 8 ounces. If your curious mid-sized dog gets his paws on a giant milk chocolate bar of 8 ounces and eats it, it might be enough to bring upon toxic effects in him, indicates veterinarians Justine A. Lee and Ernest Ward on VCA Animal Hospitals’ website. This applies to dogs who weigh around 50 pounds. If your pooch is smaller than that, he could experience toxicity with a more minimal amount. Baker’s chocolate is even more hazardous. A mere single ounce of baker’s chocolate can be dangerous to mid-sized canines. Remember, single squares of baker’s chocolate often are 1 ounce. If you ever see your dog eating any type of chocolate, get immediate veterinary assistance for him, no matter the amount. Seek veterinary care even if you don’t notice any symptoms.
Ban Chocolate in General
White chocolate is less toxic to dogs than darker kinds, but it’s still nowhere near safe for your furry buddy. Paler chocolates are fatty, and as a result can bring upon diarrhea and throwing up in dogs. Fatty foods can also make dogs more vulnerable to pancreatitis, which is a potentially deadly disorder that involves the pancreas swelling. Keep all chocolates out of your pet’s mouth, period. Never feed your dog any human food unless your veterinarian tells you that it’s safe.
Grooming Tips for Corgis
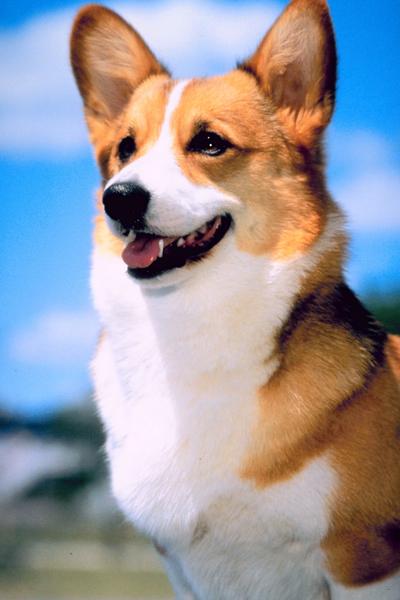
Brushing
Have your dog stand or lie on his side. Then with a slicker brush in hand, start at the back of the corgi’s hind leg and use the line brushing method, or brush in the direction of the hair growth. This helps remove any debris or tangles from the long, course outer coat and helps the brush reach the shorter undercoat of the double-coated corgi. Brush down the hock on each hind leg then brush the long hair on his thighs. Separate the hair with your free hand and brush it in about 3-inch sections. Continue up the sides brushing the coat in sections. Brush his front legs and chest in the same manner. Finish by brushing his face and ears with the slicker brush.
Bathing
Wet your corgi’s entire coat with lukewarm water. Apply a line of shampoo down his back. For the thick coat of the corgi, a texturizing shampoo that removes dirt but leaves shine works well. Massage the shampoo into the coat, then rinse it with water until the water runs clear. Towel dry your four-legged friend and spray a light leave-in conditioner on his coat; a cream conditioner may be too heavy and leave his coat limp. Finish drying his coat with a hairdryer on the lowest setting.
Trimming
The low-maintenance corgi even needs a slight trim, not a major clipping, every now and then. The most important area is the feet. Trim the hair around the top of the paws and under them around the pads with scissors once every eight weeks. Avoid cutting between the toes since the corgi has webbed toes and you may nip them. Remove any long, stray hairs over the body with scissors. Have a groomer clip your corgi’s toenails and genital area once a month.
Tips
Start grooming your corgi early and teach him to lie on him side for brushing. Since the breed experiences seasonal shedding, early preparation for future grooming is key. When brushing your corgi, look for mats and tangles. If you locate any, use a metal comb and work them out by holding the hair away from the skin and combing from the end of the hair back toward the skin. Before wetting your pup, place cotton balls in his ears to keep water out. When washing him, do not scrub the hair; this may cause tangles or mats to form in it. Never shave the corgi’s coat; the signature double coat may never grow back properly.
Homemade Dog Food Recipe

Basic Dog Food
1Pour one pound of raw ground hamburger into a large bowl. Add two cups of finely diced vegetables. Any vegetables will do, and more than one vegetable should be used. If your dog is prone to gas, avoid vegetables such as broccoli that may cause flatulence.
2Add in a half-cup of organ meat, such as chicken or beef liver, and a half-cup of plain yogurt.
3Crack three eggs into a separate bowl, and crumble the shells in the bowl as well. Beat the eggs and shells thoroughly, then pour into the hamburger mixture.
4Mix all ingredients together thoroughly. Feed two to three cups at each feeding, depending on the size of your dogs. The remainder can be stored in the refrigerator for several days.
Dog Stew
1Steam two cups of brown rice until thoroughly cooked. Steam one cup of vegetables as well, using several different kinds.
2Brown a pound of ground beef in a pan. Add the rice and vegetables to the beef after it is cooked and remove from heat.
3Pour in one cup of grated carrots and one tablespoon of vegetable oil. Stir to mix all ingredients thoroughly. Allow to cool completely before feeding. Feed two to three cups per feeding. Refrigerate the remainder.


|
A New Free Course on Dog Grooming Reveals the Secret Step-by-Step Techniques used by the best Dog Groomers in the country!
Finally, You Can Now Groom your Dog on your own at home without having to hire an expensive groomer! |