

How To Bathe a Dog: More Tips
Even though a good bath is one of the kindest things you can give your shelter’s dogs, chances are they’re not going to see it that way. But while you probably won’t win the hearts of all canines by getting them wet, you can make the experience more pleasant for both you and the dogs if you follow these steps. These instructions are appropriate for friendly shelter dogs in need of just a bit of cleaning. Heavily matted or aggressive dogs should be handled by a professional groomer.
1. Put on Your Wet Suit
2. Prepare the Pooch
Before starting the bath, you may want to let the dog get accustomed to you, and give her a chance to relieve herself. If the animal is particularly nervous, consider muzzling her and asking a partner to help you. Try to comb out major snarls in the dog’s fur, and trim her nails to keep her from clawing you accidentally. Put a drop of mineral oil in each of the dog’s eyes and cotton balls in her ears to keep water and soap from getting in them. Be sure to remove the cotton balls after the bath!
3. Lather, Rinse, Repeat
If the dog is heavy, don a back brace. Then lift the dog into the tub. Use a lightweight spray hose that can be maneuvered with one hand. Test the water temperature before spraying the dog, then gently get the dog used to the temperature by spraying water on her back and shoulders. After the dog relaxes, begin washing her head and then move gradually toward her rear; this will prevent fleas from moving up her body and congregating on her head and face. Lather the animal with a mild shampoo formulated for dogs. The active ingredient should be chlorhexidine, which is mildly antiseptic. If you must use an insecticide, use a gentle pyrethrin-based shampoo, and be sure to follow the safety instructions on the bottle. Oatmeal shampoos are good for dogs with itchy skin.
4. Make Fluffy Fluffy
Scrub and rinse the dog thoroughly. Soap stays in the fur long after it seems to be gone, so keep rinsing. When you finish, rub the dog down thoroughly with towels. Don’t put a wet dog back in her cageit’s okay if she’s just damp, especially if you have a climate-controlled facility. If you use an automated dryer that hangs on the front of the cage, test the temperature of the air before aiming it toward the dog, and check on the animal at least every 15 minutes or so to make sure she’s comfortable.
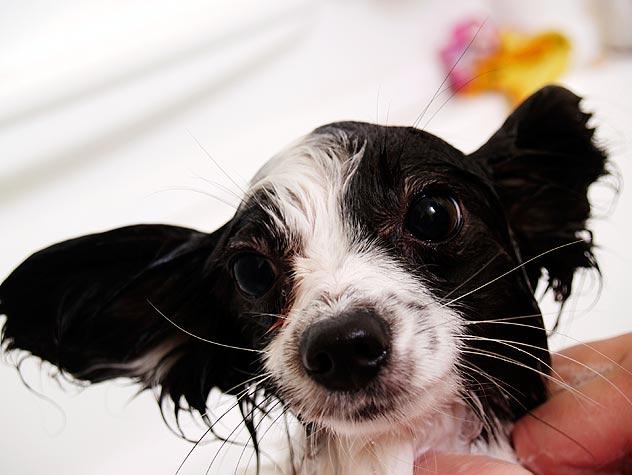
5. Suds Up the Puppies
Puppies have special bathing needs. Don’t use an insecticidal shampoo on a puppy unless the shampoo is formulated specifically for puppies and the puppy actually has fleas. With a young dog, it’s especially important to use warm water and make his bathing experience pleasant, using just the right combination of gentleness and firmness. If you are kind and sensitive to their fears, puppies will begin to regard their baths with pleasure rather than dread, making life more pleasant for you, for the puppies, and eventually for their adoptive families.
Dog Anal Gland Care
You know all that doggy butt-sniffing that we humans seem to find either appalling or hilarious? Ever ask yourself what that’s all about?

Healthy anal glands express, or empty, this fluid when the dog has a bowel movement. Unfortunately, some anal glands don’t work as they should because of inherited malformations, or because of a history of poor-quality foods that produce poor-quality bowel movements.
If the anal glands don’t empty properly, they can become impacted, making bowel movements difficult or painful, and potentially leading to infections or abscesses.
It’s not uncommon for a rescued dog to have a history of anal gland problems. Your dog may damage the delicate tissue around his anus in his attempts to relieve his own discomfort, so if you see him biting at his butt, or scooting it along the ground, take him to the vet.
Impacted anal glands can often be relieved by manually expressing, or squeezing out, the fluid they contain. This is a very smelly process, but if you’re game you can have your vet or groomer teach you how to do it. Most people whose dogs need their anal glands expressed periodically prefer to pay to have it done.
If your dog’s anal glands get impacted frequently, ask your vet to recommend a high-fiber diet to create bulkier stools. If that doesn’t work, and if your dog has repeated infections or abscesses from impaction, the anal glands may need to be removed.
At-Home Dental Care for Your Pet
Many pet owners dismiss their pets’ bad breath as simply “normal” or something to be ignored. However, bad breath is a hallmark of periodontal disease, a bacterial infection of the gums and supporting structures of the teeth. If you notice that your pet’s mouth has an odor and/or you observe discolored teeth, he or she may have developed some degree of periodontal disease. What starts as gingivitis (inflammation of the gums) can quickly lead to permanent loss of gum tissue, damage to ligaments and loose or missing teeth. Periodontal disease can cause bacteria from the mouth to enter the pet’s bloodstream and circulate through the heart, liver and kidneys.

At-home care can include the use of water additives, tooth brushing with specially-formulated toothpaste for pets, dental chew toys, kibble designed to clear and prevent the build-up of plaque and paying special attention to any changes your pet exhibits. As a pet owner, you should examine your pet’s mouth at least once a week to look for signs of swollen or bleeding gums (gingivitis), brown buildup on teeth (plaque/tartar) and abnormal lumps, bumps or swellings. Be sure to examine the back teeth (molars) by lifting the lip to expose the outside surfaces of the teeth. Also, observe the color of your pet’s gums. The gums should be shiny and pink — not white or dark red.
If you notice any usual signs or symptoms or changes in your pet’s mouth, consult your veterinarian to schedule an exam. He or she will examine your pet, inform you of any problem areas and make treatment recommendations. You might need to schedule a professional dental cleaning, according to your veterinarian’s recommendations for your pet’s particular breed and condition.
How to Give Your Dog a Bath
As much as we all love for our furry friends to smell fresh and clean, getting to that point isn’t always easy. Dogs are rarely excited to jump into the bathtub for a good scrub. Bathing fearful dogs might be better handled by a professional groomer or your veterinary office. But if you decide to wade in, here are some helpful hints.
GETTING (YOU) READY
GETTING (FIDO) READY
Trimming your pet’s nails prior to bath time will not only give your dog better footing, it will also help protect your skin in case he tries to make a break for it. Now, bring the dog into the bathroom and close the door behind you catching a wet, soapy dog running down your hallway is no easy task! Give praise and treats to make him comfortable in the bathroom before you try to get him into the tub. If you’re able to, gently putting a cotton ball in each ear can help keep water out — just be sure to remove them when you’re finished! Also, to help keep shampoo from irritating his eyes, you can put a drop of mineral oil in each one.
BRING ON THE SUDS
Dogs are unlikely to get into the tub willingly. For bigger dogs, a second person to help you get Fido into the bath can help avoid straining your back. Make sure water isn’t too hot or too cold. Let your dog hear and then gently feel the water before going full-speed ahead with the bath. Start shampooing your dog’s shoulders and then move out from there. Be gentle around the face and any sensitive areas but be sure you get down to the undercoat. Read the directions on the shampoo bottle carefully to ensure proper usage. Rinse out all the shampoo, using your fingers to make sure you get through the undercoat to avoid subsequent irritation. This is where a detachable showerhead or bowl comes in handy to be sure bigger dogs get rinsed thoroughly.
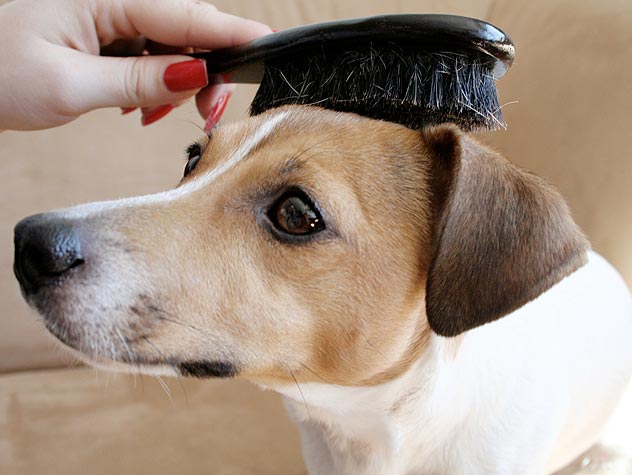
NO MORE TANGLES
After the shampoo has been completely rinsed out, you can apply conditioner, if desired. Follow the directions on the bottle because some products need to sit on the coat for several minutes. If you have a particularly squirmy dog, you’ll want to find a fast-acting formula. Once you have finished the bath, it is time to dry your pooch. Towel dry as much as possible in the bathroom. For dogs with longer coats, you may want to use a blow dryer set on low. Before the dog leaves the bathroom, brush his coat out thoroughly because the bath will loosen up a lot of fur, which is better contained in the bathroom than all over the house. Many dogs get “after-bath-crazies,” so hold onto your hat and let ‘em run!
How to Brush Your Pet’s Teeth
When should you brush?
The best time to brush your pet’s teeth is when you are both relaxed. If your pet growls, bites, scratches or shows any other signs of aggression during the procedure, stop immediately and consult your Banfield doctor for advice.
Step 1
Gently position your dog in a corner (of a sofa, chair or room) so that he will be secure and more easily handled. Carefully lift the lips to expose his teeth.
Step 2
Rub your finger over the dog’s teeth and gums for about 15 seconds to get the dog used to having something in his mouth. It might be necessary to do this a couple of times before the next step.
Step 3
Put a small amount of toothpaste specially formulated for pets on your finger, and allow the pet to taste it.
Step 4
Slide a finger brush onto your index finger and put a small amount of toothpaste on the brush. Gently rub the brush over your dog’s teeth and gums. Repeat this process for the next few brushing session. Because finger brushes are not as effective as regular toothbrushes, the pet should be transitioned to a regular bristled toothbrush as soon as the pet is comfortable with it.
Step 5
Apply a small amount of toothpaste to a bristle brush specially designed for pets. Place the brush bristles at a 45-degree angle to the gum line. Move the brush gently in circular patterns over the dog’s teeth. Start by brushing a few teeth. As brushing sessions continue, slowly include more teeth. Build up to about 30 seconds on each side of the dog’s mouth. Remember to brush both upper and lower teeth.
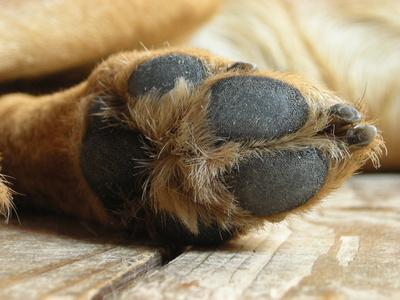
Caring for Your Pup’s Paws in the Winter
Winter can be a tough time for a dog’s paws. Prevent weather-related paw pad injuries by following some basic tips and the use of products designed for paw protection.
Preventing Paw Pad Injuries

Another threat from deicers is ingestion. Dogs may lick their paws or your boots and ingest deicing salts. To prevent your dog from ingesting deicing salts, keep a shallow bowl of warm water and a cloth near the entryway to your home so that you can wipe your boots and your dog’s paws when coming back inside.
Another common cause of sore paws during the cold winter months are the ice balls which form between the pads and toes of hairy-footed dog. To reduce the risk of ice balls, keep inter-pad hair trimmed neatly and short during the winter months. Not only can hairy feet contribute to the development of ice balls on the feet, paw hair can retain a lot of those nasty deicing salts. If your dog has hairy feet, trim them throughout the winter.
Dogs left in the cold for long periods of times are also at risk for frostbite on paws and hypothermia. It is not advised that dogs spend hours in the cold. In winter, frequent short walks are better for your dog than a single long walk
Bag Balm, a product available at nearly every pharmacy, applied in a thin layer daily or every other day should help keep your dog’s paws from cracking and bleeding. Keeping a humidifier in the house should also prevent dry, itchy skin for both you and your pet.
Products For Protecting Dog Paws
There are many products designed to protect dog paw pads during the winter month, from pet safe deicing products to protective waxes and dog booties. Safe Paw is a common pet-friendly deicer, but sand, small stones, and kitty litter (non-clumping) are also options for deicing while protecting your dog’s pads from injury and chemical burns. Musher’s Secret is one of the most popular paw waxes. Paw wax is applied to the pads of the feet before a walk, forming a protective barrier between the paw and the salty sidewalk or pavement. Paw wax will wear away after extended exercise, and should be reapplied before each walk.
The best protection for your dog’s paws and pads are dog booties. Just as wearing boots in the winter protects your pads, dog booties will prevent injury to your dog’s feet. Dog boots can protect your dog’s paws from salt, ice balls, and cutting his pads on sharp items that may be hidden under the snow or sharp ice. Proper sizing of dog booties is especially important in ensuring that the booties are comfortable for your dog to wear and maximize paw protection.
Dog booties may look silly, but really are the ultimate protection for your dog. Human snowsuits look silly also, but are they not the best for keeping sledding kids warm? Just as your kid may not want to wear a snowsuit, your dog may not initially like wearing booties. With a little time and patience, you can train your dog to love wearing his dog boots!
Instructions on Grooming Dog Paws
1Inspect your dog’s paws weekly. Look for signs of dryness or cracking in the pads, torn or overgrown nails, and minor cuts anywhere in the paw. Check for small objects that might be lodged between pads. Use tweezers to remove anything you find. Praise your dog during an inspection to send the message that paw handling is a good thing.
2Trim the fur around the paws. When long paw fur becomes matted it can hide irritating objects such as small stones and soot. Matted fur itself becomes an irritant when it cakes and hardens. Remove this fur carefully with scissors, clipping in small snips rather than cutting large chunks of hair at a time.
3Examine nails and trim as needed. Clip after a bath, when nails will be softer, and use a trimmer designed for dog nails. Take care not to trim too short, as dog nails contain a small vein, called a quick, and clipping too close to the quick can cause bleeding and pain.
4Massage Vitamin E oil or paw wax into your dog’s pads to keep them soft and prevent drying and cracking, which can be very painful. If using Vitamin E, poke a hole in a few capsules and squeeze out as much oil as needed to massage into pads. Paw wax, which can be purchased online or at pet shops, protects pads from rock salt in winter and hot pavement in summer by forming a protective barrier.
5Watch for paw licking or chewing, which can be triggered by allergies or irritants. Keep your dog away from lawn chemicals and any known allergens, including ragweed or plants in your yard, to help maintain paw health. If a dog’s paw licking becomes obsessive, seek veterinary care to determine the cause and develop a treatment.
6Handle your dog’s paws while playing or petting so the animal becomes accustomed to you touching the paws when you’re not grooming. This should be easy to do with puppies, but older dogs that are not used to being paw handled may protest. Work gently to convince an uncomfortable dog that your handling of its paws can be a time of bonding.


| A New Free Course on Dog Grooming Reveals the Secret Step-by-Step Techniques used by the best Dog Groomers in the country! Finally, You Can Now Groom your Dog on your own at home without having to hire an expensive groomer! |